Search

B N J M N

Music Producer, Audio Engineer

Blog 6: Major Project Post-Mortem

This is a final reflective blog for 16T1 which is Trimester 3 of the Bachelor of Audio course I’m currently studying at SAE Institute. In this blog I will be reflecting on my projects throughout the trimester with a special focus on my major AUD210 project. I went into quite some detail with regards to my major project progress in the ‘My Project’ blog recently so here I will be re-discussing some of those details but also touching on a couple of my other projects.

Firstly I’d like to discuss my vertical integration projects for my studio 1 unit this trimester where students from trimesters 3, 4 and 5 collaborated to write a re-interpretation of a song by an Australian artist into a different genre or style. Our group chose ‘Don’t Dream It’s Over’ by Crowded House, a classic hit. We decided on writing it in a reggae style. After a fair bit of reggae drumming research, I put together a MIDI drum track in Protools which turned out to be quite the authentic sounding drum kit in the final mix. To this I attached the chord stabs with MIDI on the off-beat. A few jam sessions later and putting it into a key that fit into my vocal range, the team recorded vocals. Had a lot of fun singing along to this new found reggae beat. Charles recorded acoustic guitar and Chris recorded bass. Chloe did backing vocals. We all had a go at the final mix down and compared and turned out Chris’s mix sat the best in terms of all the audio stems gluing together. I like how he managed to get the vocal to sit within the mix. Here is a Soundcloud link to my final mix down of this project.

The second vertical integration project for the last half of the trimester was with the same group ‘Bench’ and this time we had to create a piece of music with the theme ‘Northbridge’. After generating a few ideas back and forth Chris put forward a chord progression with an 80’s hybrid sounding drum beat and bass line and trance-like melody. It sounded cool however I wanted to try using the same chord progression but really chill it out in terms of drum pattern and see what the group thought about it. So I wrote a drum loop in Ableton this time and also came up with an acoustic guitar melody loop that I thought sounded cool. The group were happy with this idea and we got Charles to improvise and also play the acoustic melody on his guitar which sounded awesome. I got my flute into the studio and did some improvisation also. The key of the song being Ab minor with 7 flats, wasn’t the easiest key to play in on a C instrument but I managed to get a few nice scale runs in the recording time that in the editing stage I could cut out the wrong notes and keep the best parts, including increasing clip gain on the really low notes of the flute which can often be very quiet dynamically in comparison to the higher registers. Although a very simple piece in the end, it’s extremely relaxing and chilled out, but at the same time a little edgy with the minor scale, flute and drum beat which I think must be my style when it comes to creating music, so I’ve discovered. Here’s a Soundcloud link to the final mix down I did for this project.

I’d now like to move onto my major project for 16T1 AUD210 which is my collaboration major project with fellow student Matthew Osborne. Well what can I say, I’m actually overwhelmingly happy and still very excited about the result of working with him and on this awesome project. We created a 2 Track EP  from scratch titled ‘Catalyst’ and the songs named ‘Reaction’ which features myself on vocals and ‘Fire’ which is a garage/90’s House inspired track. Both tracks are inspired by a favourite artist of ours ‘Disclosure’. We took some of their ideas however made them our own. ‘Reaction’ is based on ‘Superego’ and ‘Fire’ based on ‘You & Me’ and ‘Echoes’, both Disclosure tracks. We referenced both of these tracks during production stage to assist with arrangement. Although we altered our arrangement slightly, this really helped with giving us a framework to work with during session view in Ableton.

The biggest learning curve for me in particular was actually writing lyrics from scratch. In terms of the writing process, this was a fantastic project in discovering what writing and production process works best for me. I need a drum beat to begin with, I believe this gives your entire song the basis or ‘feel’ that you want, everything builds around that. Next I needed a smooth and flowing chord progression. After playing around with some F minor chords and adding 7th notes and inverting, I came up with a cool arpeggiated effect on these chords which is when I started to really get the feel of the track. I could then hear a bunch of melodies in my head that I recorded into my phone and played them on piano into Ableton for Matt to have a listen to. I had about 6 different melodies to choose from and I wanted to pick melodies that progressed from one to the next for the verse, pre-chorus and building up into a strong and memorable chorus. Harmonies are definitely one of my strengths, once I have a solid melody, harmonies usually come to me shortly afterwards.

Next was writing lyrics. This was probably one of the most challenging parts for me. Lyrics are not the part of the production process that comes to me quickly. I need time to really think it through and make sure that a) it means something, b) it makes sense and c) a few rhyming words thrown in there of course like all songs. It was then a process of picking the right words to fit to the melodic phrases I’d written without sounding lame or too try hard. Not an easy job!

Once we had all of this in place, I spent three separate 4 hour sessions at Matt’s place where we sat down together and worked hard on arrangement and Juno sounds and drums and effects for the two tracks. Here’s a couple photos of the equipment Matt and I used including the Juno synth and the drum machine.

Keyboards.jpgDrumMachine.jpg

Matthew is awesome to collaborate with as he is so experienced when it comes to Ableton. Any musical ideas or effects that I put forward to him were instantly executed and I found we were always on the same page when it came down to ideas and sounds that we liked and wanted to use for our project. Matt was fantastic at replicating some sounds from Disclosure’s album just with his ear including the amazing Juno bass synth patch you hear in both tracks and also the ‘hook’ synth patch you hear featured in ‘Reaction’ that Matt re-created using Massive. Once we created the patches, I could go ahead and play the melodies into Ableton which was more my strength. So we worked really well together in terms of feeding off of each others strengths and abilities and I look forward to writing more music with Matt down the track hopefully.  We were also lucky enough to have our two tracks playing in the mastering suite during the student showcase on Wednesday night of May 11th. We had parents and friends and lecturers coming through the suite asking us questions about our project and it was great to meet and chat to people about our collaboration and how we produced this project. Here is a Soundcloud link to the final mix down of our major project which was completed in the large Audient control room.

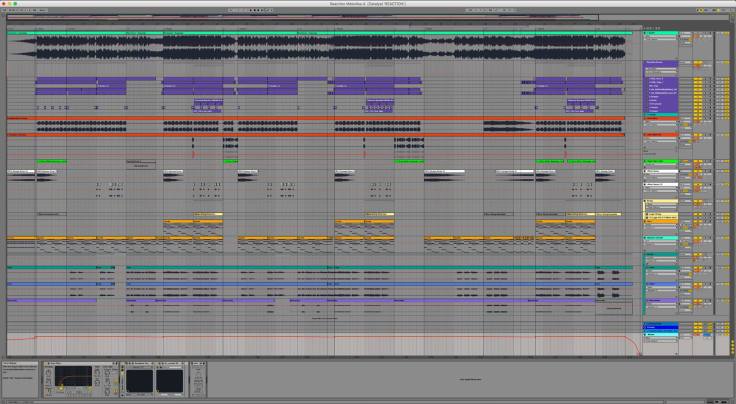
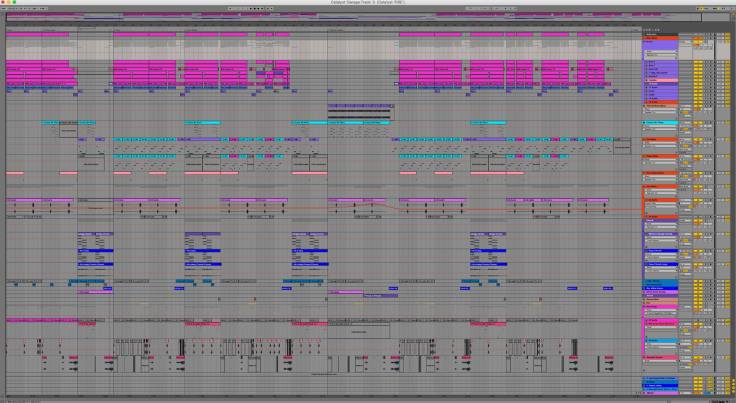
Attached below are a couple of screenshots of the Ableton sessions Matt and I worked on together. Firstly for ‘Reaction’ and then ‘Fire’.

Reaction.jpeg

Fire.jpeg

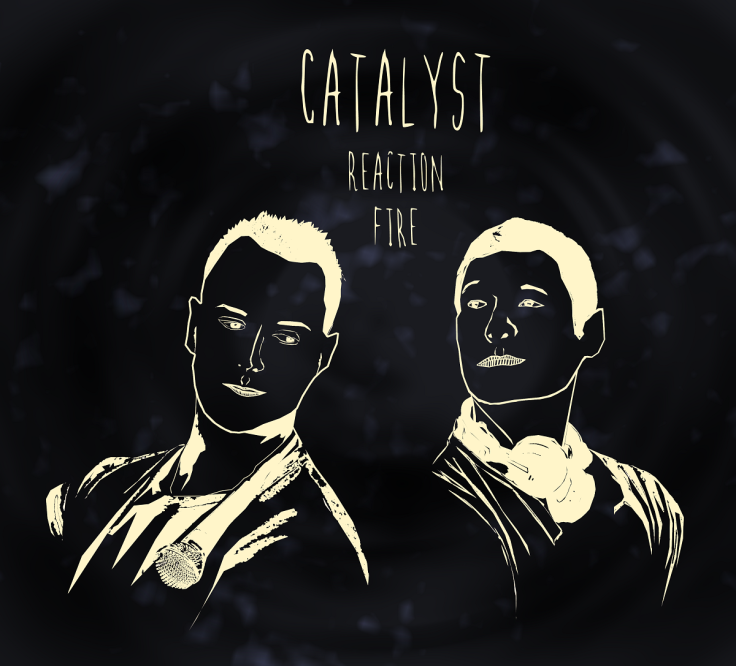
We also had some album artwork created for us. Firstly we arranged to have some photography done in the Cyclorama studio on campus with the fantastic lighting available and with the help of design student Tiff Smith. A photoshop filter was added which created a black background and simple white outline of our bodies, microphone and headphones which is similar to the original idea we had in mind. The album artwork features Matt and I together and the name of our 2 track EP ‘Catalyst’ and tracks ‘Reaction’ and ‘Fire’. We then got in contact with one of Matt’s mates who is an album artist professionally and he did a fantastic job of adding a nice textured background and simplifying the image and used a great font for the text that we were both really happy with. This is the artwork attached to our Soundcloud and BandCamp page.

Catalyst - Fire (Deep Blue Version - Bandcamp).png

When I reflect on this trimester as a whole, I’ve enjoyed everything about it. From creating sounds during the tasks in class, to learning Ableton, to creating my own synth patches in Massive, to working with MIDI input, working on a remix etc it’s all been really insightful for me and discovering that electronic music production is definitely an area I want to focus on more throughout the course if I can. I’ve always wanted to write music, so to be able to create sounds and have the tools and contacts now to fully execute these creations in a professional way, it’s a dream come true and the reason I have enjoyed trimester 3 so much. Attached below is a link to the Band Camp page Matt and I have recently set up for Catalyst.


Blog 5: Plug-in Review

“A little FATNESS can go a long way”

I’m going to review a plug-in that was introduced to me at a recent guest lecture at SAE Institute by ‘Wasteland’. It’s called ‘Sausage Fattener’ by Dada Life. Not only is the name quite comical itself, it’s actually a great plug-in when it comes to adding that greasy and dirty edge to your mix. It’s used by some very well known DJ’s and producers including Tiësto, Kaskade, Diplo, Dirty South, Hardwell and Zedd to name a few.

SFScreenShotFull

At an extremely affordable pice of only $29 USD, this plug-in comes with a simple three knob interface, Fatness, Color and Gain. With these two parameters you can create loads of different sounds. With moderate settings this plugin can be used on a single channel as a compressor, however at the other end of the spectrum it can used for dirty distortion. It’s also suitable for use on sub groups ie. drums and bass, or on a stereo master track as a mastering plugin.

The ‘Fatness’ knob adds complex saturation to the signal as well as boosting the initital signal by as much as 30dB. Upper harmonics are introduced to the fundamental tone which causes subtle distortion. The ‘Color’ knob adjusts the distance between the harmonics within the saturation algorithm. By increasing the value of the ‘Color’ knob you begin to increase the volume (amplitude) of the higher harmonics which causes the timbre to become brighter. Too much saturation and the original signal can become too large and hence why a ‘Gain’ knob is included. This way you can adjust the overall volume of the signal and keep a close eye on the clipping indicator, also included alongside the ‘Gain’ knob.

To illustrate this process I will provide a couple of images below that demonstrate a simple sine wave of 261Hz (middle C on the piano) and shows that the ‘Fatness’ knob has reached it’s maximum at full saturation of the signal. As seen below you can see a multitute of upper harmonic overtones added to the fundamental tone. This adds character to the original timbre.

SFSineMiddleC-1024x256

A simple sine wave at 261Hz with no saturation.

SFHarmonics-1024x254

The same sine wave at full saturation; notice the upper harmonics that are introduced.

This type of saturation would be most appropriate on a signal that you want to have more impact and presence for the listener ie. bass lines and lead lines. Another more subtle way to use this kind of saturation is as a mixing technique to tame signals as well as accentuate them. For example an 808 bass sound that needs a bass boost or more presence but you don’t want it to take over the entire mix. This is really important for engineers in this day and age when more and more listeners are enjoying music with ear buds or laptop speakers that are not reproducing audio signals that are low in frequency.

‘Sausage Fattener’s also great for overall mastering, which is how the guest lecturer ‘Wasteland’ was using this plug-in. In this case you would insert the plug-in as the very last device in the mastering chain with a low fatness value of only 8% and color value of only 10%. This gives you the sense of the subtle yet extremely effective saturation and loudness characteristics that this plug-in can contribute to your overall sound. Attached below is a great/hilarious video with an audio example of how the Sausage Fattener plug-in works. Take a look.

Blog 4: Your Project

In this blog I will be discussing the progress of my major project for AUD210. What I’ve chosen to do is collaborate with Matthew Osborne who is in my class and we have decided to produce a two track EP from scratch based on one of our favourite artists, Disclosure. I’ve never written anything from scratch before so I’ve been super excited about this collaboration project.

The two tracks will have different styles each, one very laid back around 80bpm with a 16th note synth-pop feel and the other a more up-tempo garage based track around 130bpm. The Disclosure tracks we have referenced whilst producing ours are ‘Super Ego’ and ‘You & Me’ both by Disclosure. We had actually discussed collaborating like this earlier in the course so this project is a fantastic opportunity to finally get together and do something we are both extremely passionate about doing.

So far I’ve absolutely loved every part of producing these two tracks. We’ve had a fair bit of file sharing and ideas that have gone back an forth between us as we both find when it comes to the crunch we are more productive in our own spaces at home rather than together, which is good because all the best parts are made on our own then when we get together we can focus more of arrangement and combining our work rather than the intricate musicality details which can often take a lot of individual concentration. For example, when I was writing the lyrics and chords I needed to be on my own as it was a challenging process for me that required intense focus. Of course once I had written a ‘story’ so to speak I shared that with Matt and he would then provide his feedback on what he liked or didn’t like about it, what works etc. The same goes for any other musical samples we’d created individually.

In terms of how we’ve got to where we are now with the status of both tracks, well they are coming along really well and I’m fairly excited about these little babies of ours to be honest. Firstly Matt sent a drum beat to me which was a fantastic first step and definitely his forte, drums and effects. From there I had a great loop with a similar feel to reference track and I could start getting creative with it. I played around with a few minor 7th chords in the key of F minor and after having a good play around came up with a progression that I really liked the sound of. Added an arpeggiator in Ableton to the ‘saw beep’ chords and bam, the feel was suddenly there. This was the exciting part, watching it come to life. This was the step that opened the creative doors for me. All of a sudden I could hear melodies in my head, firstly one, then two, three, four and five usable melodies, no words, just melodies.

Then it was time to attempt the lyrics, which was quite challenging in itself for my first original song. I sat there staring at the white piece of paper in front of me thinking where do I begin. I think writing lyrics is something that needs to come from the heart. Anyone can throw a few rhyming words on a piece of paper but I wanted meaning in the words, I wanted it to represent a state of mind, I wanted it to tell a story. Whether I’ve achieved that or not I’m not sure but I simply wrote down what came to me and after a couple days I finally had something that resembled the structure of a song. Two verses, a pre-chorus, chorus and a bridge.

The next challenge was actually fitting the words I’d written to the melodic phrases I’d written without it sounding too lame or complex. The idea of our project is simplicity with quality not quantity when it comes to the sounds we’ve carefully chosen. After changing a couple words around within the song I was happy, so was Matt.

Matt and I recorded vocals last Friday in the studio. Doing vocals myself has made it easier for Matt I think as it’s not like we had to work with an outside vocalist for the track and didn’t have to worry about teaching a vocalist the melodies I’d created etc. The recording process was awesome, Matt and I work so well together and as a vocalist he was brilliant at communicating and I think he really got the best out of me that day. So here below is a short demo of our track ‘Reaction’ at one of my favourite parts of the song, you get a good idea of the powerful Juno synth sample we created and recorded ourselves as well as the break down into the bridge section of the vocal stems.


Blog 3: Remix Post Mortem

After sifting through various stems online I decided on a remix competition for ‘Joakim Carley feat. Reece Lemonius – Warrior’. What drew me initially to this originally drum n bass track was the vocals and also the piano and guitar stems. There were a few nice filter sweeps in the piano stem that I liked and the guitar part sat well in the mix. This remix task was my first experience using Ableton Live and I must say I absolutely love using Ableton. Although the interface doesn’t seem as clear as Protools, the amazing samples and sounds and ability to work in both session view with loops and then arrangement view for building your music. Considering the first two trimesters of my course have been primarily focussed on Protools, it’s great to be introduced to a new DAW and one that I love using too. I know I’m going to get a lot out of this software and EMP is definitely an area I am enjoying more in terms of my course of study.

However, back to the remix, so I began by loading the 3 stems into Ableton and probably the one of the hardest parts of this task was lining up the vocal with the piano. I had to reference the original drum n bass track a few times as the vocal starts on some crazy beat during the 5th bar so it wasn’t a case of just throwing the stems in wherever. I wanted the piano and vocal to stay as the original but I wanted to create a completely different feel based around a new drumbeat. I found a nice deep kick and a cool rim shot sound that I wanted to experiment with and pretty much made a loop that came to me when listening to the vocal and piano track. I thought it’s easier to choose a drum n bass original and chill it down with a nice chilled drum beat rather than the other way around and trying to write drum n bass which would be challenging.

Once the drum beat was down the new feel had been created and from then on I could just build the track. I experimented with some ambient sounds from the Ableton library and picked a few notes that fit within the key of the song which is F#minor. I then added a sub bass line which was the root note of each chord as I was after that real smooth and warm sub bass sound from the bottom end. Anything saw or square like wouldn’t have fit with the mix. I then added some high hats during the chorus and you’ll notice a slightly different rhythm from the first chorus to the second. After the first chorus I threw in the root chord being F#minor and added the 7th to the chord for colour, then the second 8 bar block moved the 7th back to the root to bring the sound back to the tonal centre of the song. This kind of thing seems fairly straightforward to me having a music theory background and a clear understanding of how piano chords work, so it definitely comes in handy when creating synth effects and chords.

From this point I laid out a basic arrangement which was the fun part, putting it all together and figuring out which parts for example the guitar I would bring in and when. I felt by this point I needed to add some other percussion effects like a cymbal crash at the end of the second chorus and the chimes at various points throughout the mix. I wrote a alternate sub bass line at around 3 minutes into the song at a point where the bass is the focus as everything else had reduced down. The finger click that I added here works well in this section keeping it cool, calm and collected. Overall it was a lot of fun working on this and hoping to continue entering remix competitions in the future. Take a listen to my remix below.

Blog 2: The Most Important Audio Discovery of the Last 50 Years

This weeks blog task is to discuss the most important audio discovery in the last 50 years. Rather than just one specific audio discovery, I’d like to venture into the topic of the evolution of the portable music player over the last 50 years or so. Of course I could focus on the single discovery of the ever so popular 1979 SONY Walkman itself or even the 2001 Apple iPod that has now dominated the world of portable music players, however I think it’s interesting to take a good look at how in fact these discoveries began, how they evolved and where portable music players are today in 2016.

In 1954 the first ever monophonic portable transistor radio was invented by Texas Instruments and the Industrial Development Engineering Associates. It was called the ‘Regency TR-1’, weighed 340 grams, sold 100,000 times and sold out after 6 months. It was extremely popular, not only because you could listen to the radio outside of the home, it had a revolutionary design and came in an assortment of colours. For a cost of $49.90 you could own one of these, which is equivelent to about $450 in today’s world.

Eight years later in 1962, the first portable stereo music player was invented, otherwise referred to as the ‘boombox’ and consisted of a vinyl record player and 2 speakers. It was compact and folded into a suitcase. This discovery paved the way for future portable music players.

Along came 1965, at which time Phillips released their  compact cassette tape. It was predominantly used for recording dictations. You could play up to 45 mins on a single tape. With this release was the Phillips stereo portable cassette player which dominated the best of 20 years after it’s release. Although portable, it weighed about 1.5kgs, operated with 5 flashlight batteries which lasted about 20 hours of continuous play. Special features included the ability to fast-forward and re-wind. It was quite an expensive device at $150, which is equivalent to about $900 today.

1979 was a very exciting year. The year of a revolutionary invention. It was the birth of the first real walkman, the SONY TPS-L2. Although at a cost of $274, it was one of the most popular devices to ever hit the market, particularly amongst the youth. It was small, compact and lightweight at only 500grams, one third of the weight of the previous Phillips cassette player. It also had a couple of extra features including two headphone jacks so that two people could listen simultaneously and also a ‘hotline’ button which activated a microphone and stopped the music which allowed the listeners to speak to each other. It was an outrageous success with over 200 million sold.

In the early 1980’s the world of digital music was introduced with the discovery of the compact disc or CD as we know it. In 1984 SONY were quick to release a portable CD player known as the Discman. This was the first ever portable digital music player and praised for it’s sound quality, ability to skip and repeat tracks and remote control capabilities. On 4 x AA batteries this device would play continuous music for only 2 hours. It also weighed about 1kg. Although it was a big seller, it wasn’t very portable as any knocks or bumps would disrupt the playback. The cost was $350, about $700 in today’s world. Later models and brands soon released versions of the Discman with anti-shock capabilities which deemed the product more profitable.

In 1998 the first ever Mp3 player was released by ‘Saehan’ a South Korean company called the ‘MPman’. It came with 32MB of RAM (or extended to 64MB) which on average held only about 8 tracks of music. It weighed only 65 grams and had a rechargeable battery pack lasting 9 hours. At $400 it wasn’t a huge success. It was difficult to use and this resulted in poor sales.

2001 was a major milestone in portable music technology with Steve Jobs at Apple Computers releasing the first ever iPod. It was praised for it’s sleek minimalistic design and fancy interface, which set it apart from competitors. With a whopping 5GB HD and a catchy advertisement slogan of ‘1000 songs in your pocket’ the Apple iPod took the world by storm. Weighing 185 grams, offering 9 hours of continuous play and a rechargeable battery the iPod won the hearts of many. Since it’s first release many revised editions of the iPod have entered the market with 250 million sold and counting today. Apple iPods these days feature HD screens, cameras, applications, games, storage, books, wifi capabilities and countless amenities. The iPod has evolved into a mini computer that fits in the palm of your hand.

With many illegal websites and applications designed for sharing music, Apple released iTunes in 2003. It was a simple yet cost effective way to buy music online. It was fast, convenient and most importantly it was legal. With the development of iPods and iTunes, local record stores became practically extinct. Like most Apple products and services, other brands have attempted to copy but have had no success. These days artists use iTunes as an offical platform for advertising and promotion of their music.

I think it’s really interesting to look back on the evolution of portable music players over the course of 50 years or so. To evolve from a monophonic AM radio device in 1954 to a practically lightweight multi-functional computer in your hand in 2016, portable music technology has definitely come a very long way.


REFRENCES

Anthony Murdock (2012, May 11). Evolution of portable music playersRetrieved from https://youtu.be/3cURYuD79Xg

Kopf und Stift (2012, June 12). The evolution of portable music players Retrieved from https://youtu.be/m5Trs-KNNIw


Blog 1: Introduction Post

Welcome to my introductory portfolio entry for AUD210 which forms part of the academic requirements of Trimester 3 of the Bachelor of Audio course here at SAE Institute. If you’ve successfully managed to access this post, then you have officially stepped into my studio production online Portfolio.

I’m Benjamin Pfeiffer, or just Ben is fine. I enrolled into this course as I have a passion for music production, sound and audio. After working for many years in a completely different industry, I made the huge decision to go back to school and study my passion. Although it’s been tough adapting from full-time flying to student life, I must say I haven’t looked back. You know you’ve chosen the right course when you find yourself interested in all areas of your learning.

Initially going into this course, I had my heart set on live sound engineering. The many concerts and shows I’ve been to over the years, I’ve always been fascinated by the large multi-channel sound desks and array of speakers, particularly at music festivals. Throughout the course so far we’ve gone into great depth on the physics of how sound travels, acoustic spaces, microphones and signal processing, digital audio workstations and recording and mixing in the studio. We haven’t yet gone into live sound however I believe this is next trimester. In the current trimester we are learning about electronic music production which is an area I’m becoming extremely interested in because it’s just so much fun. I love electronic dance music, so learning how to create it is even better!

The intention of this blog is to keep a record of project progression and discuss topics relevant to my course. Throughout my online Portfolio you will find links to various pieces of work. Once my tasks are completed they are uploaded to my SoundCloud page and links are also created on this site. I also have a link to my YouTube channel which contains a few of my own piano and vocal recordings. Moving forward I plan to keep these two platforms as well as this online portfolio updated with my latest projects and productions here at SAE Institute.

Most of the work I have produced so far has been tasks and projects required during my course. For example, last trimester in our production unit, our group recorded and mixed a well established blues band here in Perth. It was a great experience and I learnt a lot about live tracking and got a lot of tips from lecturers about how we could improve i.e. alternate microphone placement techniques and ways of reducing bleed and unwanted noise. It was interesting comparing the final result in front of peers. It proves that we all have individual ideas on what sounds good and how much processing is required based on your own taste. It was a great unit for improving teamwork and communication skills as well as technical skills within the studio environment. Attached below is a SoundCloud link to one of the final submissions of last trimester named “Speak My Mind” by the Vibrolators.


Blog 5: Social Media and Your Career

This week’s lecture and tutorial was all about social media platforms and how important social media is for business when used in the correct way. What I found most useful personally was the seven great steps to be mindful of when using social media to promote your business.

Firstly, you need to think about your objectives. What are they exactly? What do you want to achieve. Secondly who is your target audience and what is your ideal client? It’s important to think about what type of network you would choose to attract this certain type of client as different networks are suited to different audiences i.e. Facebook and LinkedIn.

It’s then important to look at what user name, logo and tagline’s you would use keeping it consistent between all platforms. Then you’d need to set it up professionally. It’s important to make sure you upload quality content, idealy 30% promoting yourself, 30% promoting someone else, 30% quality information and the last 10% a bit of personal “bling” like a video that motivates you, a meme etc.

Continue reading “Blog 5: Social Media and Your Career”

Blog 4: Inclusive Design

This weeks lecture and tutorial was based around ‘inclusive design’ and what this means in the creative media industry.

According to my understanding ‘inclusive design’ refers to the catering of creative projects for marginalised groups of people. It’s about broadening your target audience to include these groups, whether it be a disability, certain age groups, race, gender, sexuality or cultural differences.

Creative media must be designed in a way that is inclusive of a wider audience rather than sticking to certain stereotypes, cultures or even as simple as what you like yourself. Just because it’s your cup of tea, it most likely is not someone else’s as we are all different and have very different ideas on what is creatively appealing.

Continue reading “Blog 4: Inclusive Design”

Blog 3: Secret Interview Techniques

During today’s class we discussed job interviews and in groups prepared a list of interview questions we would expect to be confronted with in a professional interview for employment. We then acted out an interview role-play scenario which was a lot of fun, to say the least. It exposed a lot of us to the “not so professional” way to conduct yourself in an interview. For eg. slouching body language, general laziness, unprofessional mannerisms and what “not to do” ie. call your mother… haha… as literally demonstrated by one of our classmates. Hilarious.

Although I’ve experienced many interviews in my time for various jobs, I must admit they don’t seem to get any easier. I get extremely nervous every time. I feel nowadays and with the recent job interview I’ve had for a hotel and also a causal position in a retail store, I walked away from these interviews feeling fantastic and had a good feeling that I did well.

Continue reading “Blog 3: Secret Interview Techniques”

Create a free website or blog at WordPress.com.

Up ↑